Application design
Contents
- Introduction
- How to approach the application design for the coursework
- Review your design against the design principles, iterate
- References
Introduction
What this guide covers
This guide covers only a subset of the teaching materials and focuses specifically on the techniques that are likely to be most relevant for the COMP0035 coursework. The coursework is open-ended, so you may create a design that differs from the following.
The result of applying the steps in this guide will be one or more diagrams. You should not explain those diagrams with words; the diagrams should be easy to read and understand. Where text may be needed is to briefly explain any decisions you made that affected your choice of diagram or the design it contains as these may not be obvious in the final diagrams.
Design principles and patterns
This is covered further in the lecture notes with references for more information in the reading list.
- KISS: prefer simple to complex. Follow standards that make code easier to read. Deconstruct problems into smaller ones; give each function one thing to do. Use the least complex algorithm, data structure etc.
- DRY: do not repeat business logic; some code may be repeated if it relates to different business logic.
- Loose coupling: Coupling is the degree of interdependence between software modules. Keep dependencies between modules/classes to the minimum needed.
- High cohesion: Cohesion is the degree to how strongly related and focused are the various responsibilities of a
module; and how they work together to create something more valuable than the individual parts. Suggestions to
increase cohesion:
- The functionalities embedded in a class, accessed through its methods, have much in common.
- Methods carry out a small number of related activities, by avoiding coarsely grained or unrelated sets of data.
- Related methods are in the same source file or otherwise grouped together; for example, in separate files but in the same subdirectory/folder.
- Separation of concerns: A design principle for separating an application into distinct sections such that each section addresses a separate concern. A concern is a set of information that affects the code of a computer program.
- Modular: separate code into modules. The functions within a module should be cohesive. Modules should be loosely coupled.
There are many more sets of principles such as SOLID, GRASP if you want to try and apply these!
Many of the principles relate to object-oriented design. While your design will have some classes (objects), they will also have many functions that do not belong to a class. In Python, functions may be grouped in modules.
One way to follow these principles in your application's design is to apply relevant design patterns. A design pattern is a general blueprint to solve a common problem. Two patterns are considered in this guide:
- Model view controller (MVC): application design pattern for apps with a user interface that separates business logic and views from the underlying data
- REST: architectural pattern for building distributed systems; there are patterns that can then be applied to the REST API itself
If you read further about design patterns, you may find others that are useful to you for the coursework. The Reading list has further links and there is plenty of information online as well as in the UCL library.
NB: This guide applies specifically to the COMP0035 coursework and so refers to classes and modules (groups of functions). Where techniques are borrowed from object-oriented design, they have been adapted to the needs of this course.
Designing for apps that will be developed using Flask and Plotly Dash
In COMP0034 you will develop the apps that you are designing in COMP0035.
You can design an app without knowing the technology used to implement it. However, as you have to use either Flask or Plotly Dash in COMP0034 then designing your apps in a way that considers how those technologies work should make it easier to implement your designs in code next term.
The Flask and Plotly Dash frameworks were selected as they use Python, are freely available, and have an established user base so are supported by documentation, user support forums and examples.
The reason both are used in COMP0034 is that they serve different purposes:
- Flask is a framework for developing web apps.
- Dash open source is a framework for developing data visualisation dashboards.
Dash extends Flask. Integrating Flask and Dash apps isn't seamless, though is possible.
While many other frameworks exist, you must use Flask and Dash for the COMP0034 coursework.
Application design for the coursework
Please refer to the COMP0035 coursework 2 specification as this explains what you need to design. This will vary for individuals and groups.
You are not allowed to deploy the coursework to infrastructure where it may be accessed by others. In seeking ethics approval for use of the data sets it was agreed that none of the apps would be deployed.
If you wish to design your app considering a particular infrastructure architecture that is influenced by deployment then you may do so. You can design it even though you are not allowed to actually deploy it.
For this coursework it is assumed that you are designing for a sole computer running the development version of Flask and Dash (i.e. using the internal Werkzeug server bundled with Flask).
The structure is likely to be similar to one of the following:
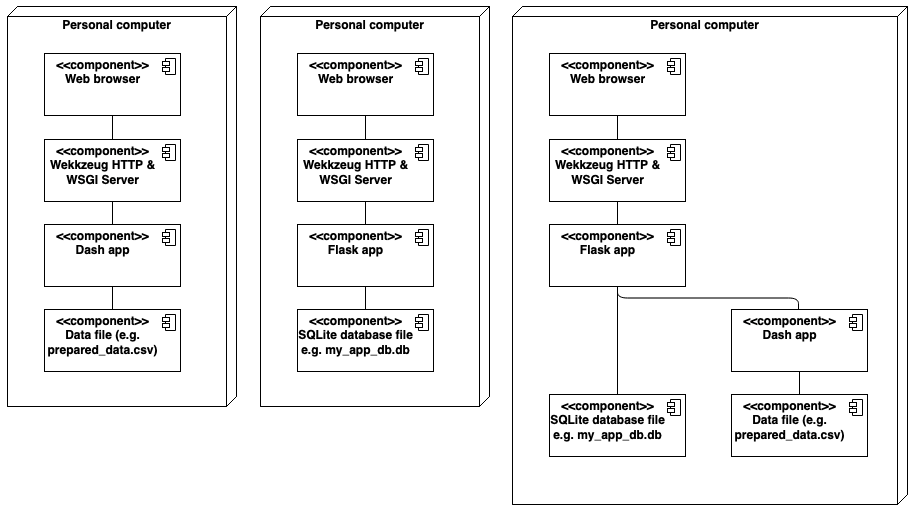
The above diagram uses the UML notation for a deployment diagram. You are not required to use UML for the coursework.
The database design is covered in a separate guide.
The types of app you will be developing, and the implications for the application design are summarised as:
| App type | Development framework used in COMP0034 | Aspects to include in the application design |
|---|---|---|
| REST API | Flask | URL, Data format (JSON), HTTP methods, Data that is returned |
| Web app that includes a machine learning model | Flask | Routes (URL) and HTTP methods; Classes that model the data (not be required if the only functionality is to interact with the machine learning model); Functions that control the expected behaviour for each route |
| Web app with a non-ML functions that use the data | Flask | Routes (URL) and HTTP methods; Classes that model the data that will be stored in the database; Functions that control the expected behaviour for each route |
| Data visualisation dashboard | Plotly Dash (Python open source version) | Classes that model the data; Functions that generate the charts; Functions that update the charts |
The rest of this guide covers how you might approach the design for each of these app types.
Application design for REST API
REST overview
An Application Programming Interface (API) allows two systems to communicate with one another. An API essentially provides the language and rules for how two systems interact. An API has documentation and specifications which determine how information can be transferred. It is suggested you use the API documentation as the architecture design for your application.
A REST API "is an application programming interface (API or web API) that conforms to the constraints of REST architectural style and allows for interaction with RESTful web services. REST stands for representational state transfer and was created by computer scientist Roy Fielding." source: Red Hat, 2022
The rest of this section suggests a step-by-step approach to design a RESTful API for your coursework.
1. Choose a way to diagram/model the RESTful API design
There is no single way to represent the REST design.
A useful format is shown in the example here which you could use/adapt. It is an API for data with polls where a poll can have one or many votes.:
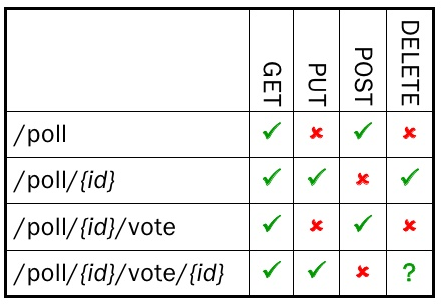
Source: Slide 25, Cesare Pautasso, 2010
Another option is to use an API design tool. There are many freely available tools, a few are listed below. If you use a tool remember you must export the design so that it is included in your coursework zip on Moodle; linking to an external system is not acceptable for coursework submission. Examples of API documentation tools include:
You could also choose to create other formats to model the design such as a UML class diagram .
2: Decide on the resources and data format
Decide which resources, that is the objects or data, you intend to provide to those using your API.
For example in a movie related data set this might be: movies, reviews, ratings
Decide what format the resources will be returned in when an API request is made. The most common formats include JSON, XML and YAML. Though data feed formats such as RSS; or database formats such as csv and SQL; are also possible. JSON is typical for the coursework and will be covered in COMP0034.
Example of JSON format:
{
  "recordID": 1,
  "dateTime": "2022-02-10T13:45:00.000Z",
  "x-value": 27.34,
  "y-value": 5.55
}
Provide a list of the data attributes. This is likely to be the first row of your prepared dataset. List the attribute names and the data types.
You can either do this in JSON as per the above example, or you can list in a table format.
3. Decide on the URIs
A Uniform Resource Identifier (URI) identifies a resource on the Internet and is defined in the RFC 3986 standard. A Uniform Resource Locator (URL) and Uniform Resource Name (URN) are both types of URI. A URL identifies the location of a resource and how to retrieve it e.g. http://example.com/example.html where 'http' is the access method, 'example.com' the domain, and 'example.html' the resource. A URN identifies the resource name but doesn't necessarily identify the location. You will use URLs to identify the REST API resources.
The URI structure according to the RPF 3986 standard is:
scheme "://" authority "/" path [ "?" query ] [ "#" fragment ]
Best practice guidance for naming URLs is given here and summarised below:
- Use URIs that describe the resource and follow a predictable, hierarchical structure.
- Use hyphens rather than underscores to make them readable as underscored are nearly invisible due to the underlining
of hyperlinks e.g.
http://api.example.com/new-products/fresh-fruitand nothttp://api.example.com/new_products/fresh_fruit - Don't include file extensions in URIs. The content type is determined in the Content-Type header.
- Use lowercase if possible. URI components, except the host name and schema are case-sensitive.
- Use forward slash and not backslash to indicate hierarchical relationships
e.g.
http://api.canvas.com/shapes/polygons/quadrilaterals/squares. Some APIs will send error 301: Moved Permanently if they receive a backslash. - Use queries to filter results rather than a new API route e.g.
http://api.example.com/device-management/managed-devices
http://api.example.com/device-management/managed-devices?region=USA
4. Decide on the HTTP methods
For each of the resource URIs decide on the HTTP methods that apply to each. The most common methods to use in a REST API are:
| URI | GET | POST | PUT | DELETE |
|---|---|---|---|---|
| https://{hostname}/api/people | :heavy_check_mark: | :x: | :x: | :x: |
| .... etc. |
Application design for a Flask app (machine learning or other)
MVC pattern in Flask
If you are designing a web app that deploys a machine learning model or some other functionality based on your dataset then you will need a different approach to the design. A modified version of the MVC approach is suggested here. Though, if you find a design pattern you believe is more appropriate; use it.
The goal of the MVC design pattern is to separate the organization of data (model) from the user interface and presentation (view) by introducing a controller. It is a common design pattern for web applications and is explained elsewhere in the teaching materials so is not repeated here.
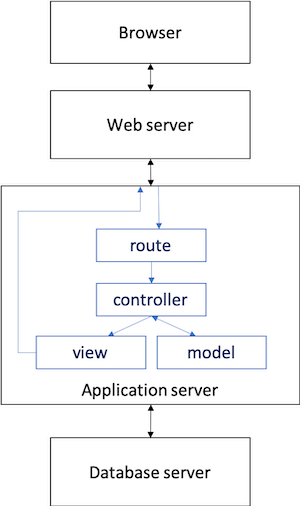
Flask does not enforce an MVC pattern, so you do not have to design it following this pattern. However, the typical structure of a Flask app is broadly similar to MVC as follows:
Routes and controllers: Each route has a controller action. When you enter a URL, the application attempts to find a matching route, and, if it’s successful, it calls that route’s controller action. Within the controller action, two main things typically occur: the models are used to retrieve all the necessary data from a database; and that data is passed to a view, which renders the requested page.
Models: Represent the data and its related logic. It interacts with the database and determines the data that is being transferred to the controller.
Views: In the view, the data is accessed and the information contained within is used to render the HTML content of the page the user ultimately sees in their browser. Views are generated using Jinja2 templates which in turn return HTML pages that are styled using CSS.
Applying this MVC-like model to a Flask app would result in an application architecture like this:
For this aspect of the coursework you will design the application's routes (URL), controllers (functions), and models ( classes). You are asked to model the Views using wireframes.
1. Design the model classes and their methods
In Flask and the MVC pattern the term model refers to the data or objects in the app. For example, imagine a university app used by students then a model of a student would be a Python class that contains the attributes and methods associated with the type of user for your app.
class Student:
    def __init__(self, identifier, last_name, first_name, year=None):
        self.identifier = identifier
        self.last_name = last_name
        self.first_name = first_name
        self.year = year
In machine learning, a model is the output an algorithm that has discovered patterns from training data. The model can then be used to make predictions or determine a result from new data given to it. For example, an ML model for computer vision might be able to identify cars and pedestrians in a real-time video. One for natural language processing might translate words and sentences.
The design and creation of the machine learning model is outside the scope of this coursework. Treat this as a black box in terms of the application design and assume you have created a model and saved it using Pickle e.g. model.pkl.
If your app uses a machine learning model but there is no concept of any other data, then you can skip this step as it will not be relevant.
The following is a simplified version of the object-oriented technique data driven design (DDD) approach to identifying classes.
This approach identifies all entities in the system (ultimately classes) without considering responsibilities. There is an alternative approach, responsibility driven design that is not covered here.
A simple method to apply the DDD approach is to identify nouns, adjectives and verbs:
- Nouns and noun phrases in the domain/requirements/use cases suggest classes
- Adjectives imply an attribute
- Verbs and verb phrases indicate candidate operations for the classes
The steps to achieve this:
- Use your requirements/user stories/use cases/any other domain knowledge as source material. Underline all nouns and noun phrases.
- Create a list of candidate (potential) classes from the words you underline.
- Review the list and remove duplicates.
- Underline all verbs and verb phrases.
- Use the verb and verb phrases to create a list of candidate operations and assign them to classes.
- Iterate
- Where you know them at this stage: Add data types for the attributes and return types and parameters to the methods. You may not yet know this level of detail.
You should end up with a list of candidate (potential) classes and their methods.
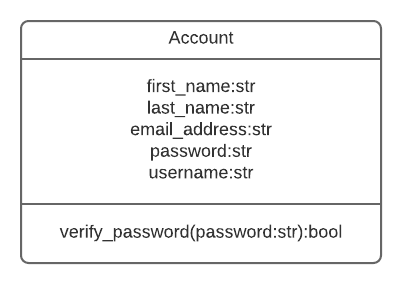
For example:
Class name: Account
Attributes:
- First name
- Last name
- Email address
- Password
- User name
Methods:
- reset_password()
- verify_password()
You don't need to specify getter and setter methods for each attribute.
Add the data types to your attributes if known e.g.
Class name: Account
| Attribute | Data type |
|---|---|
| First name | str |
| Last name | str |
| Email address | str |
| Password | str |
| User name | str |
If you know any parameters or return types for the methods you could also add these. You may not yet know them in which case you don't need to add them.
As an example this method takes a password in string format and returns a boolean (ie the password is either verified or not)
verify_password(password :str) :bool
The classes will be your 'models' in the MVC structure.
There is more detail on how to identify and capture classes in the optional material on object-oriented design. You are not being assessed on object-oriented design in this course though some students may wish to explore that.
If you read the optional material on object-oriented design and wish to create a UML class diagram for this aspect please do so. If using UML class notation then the above class might be shown as:
2. Design the routes and controllers
The routes will correspond to the URLs in your app. Each route will have a function (or 'controller') that is carried out when the URL is accessed.
Start with:
- your wireframes (these represent view). Often, but not always, a wireframe implies a route.
- the list of functions identified from the verbs in step 1. Are there any functions that imply a view or a change to a view? These might be route controllers.
Identify:
- The route URL from after the domain
- Given a URL as follows (fictitious) to generate an HTML page for a paralympic event which has an ID of
1:
http://www.myparalympics.com/events/1 - The first two elements of the URL represents the protol (e.g. http) and the domain (e.g. www.myparalympics.com). Do not include these 2 elements in your design for the routes.
- 'event' is an optional subdirectory structure. This is useful especially where routes are part of a module.
- 'event/1' is the route that will generate an HTML page for the event with an event_id of 1
- This is represented in the table below.
- Given a URL as follows (fictitious) to generate an HTML page for a paralympic event which has an ID of
1:
- The HTTP method(s) (if you know them)
- GET to retrieve a resource (e.g. object, record, file)
- PUT to change the state of or update a resource
- POST to create a resource
- DELETE to remove a resource
- Form data can be sent using either GET or POST
- GET: Appends form-data into the URL in name/value pairs. URL length is limited (| 3000 characters). Do not use to send sensitive data as it is visible in the URL. Useful for form submissions where a user wants to bookmark the result, or search queries.
- POST: Appends form-data inside the body of the HTTP request so data is not shown in the URL. Has no size limitations. Form submissions can’t be bookmarked.
- One route can be associated with different HTTP methods that return different actions. For example, the '/event/' route with GET may return a list of all events, while the '/event/' with POST may add a new event. See table below.
- The function associated with the route (in MVC terms, this is the 'controller'):
- Include the function name. Name the function appropriately, so it suggests what the function does.
- You can add a brief explanation of what is returned from the route. This pseudo docstring will be useful when you generate the code next term.
- The function name does not need to be the same as the route name; though the function names must be unique within the application.
- Some routes may have a variable element such as 'event/<event_id>' that require a variable value to be passed. The optional parameter name should match the parameter name used in the function. See the example route in the table below.
- Optionally, a reference to the wireframe associated with the route (if it has one).
There is no set format for representing this aspect of the design. If you documented the 'model' classes in a class diagram then you could add your routes to this and adapt the class notation to represent the route name and the associated function. The following uses a table format; this is simpler to present and understand though doesn't show relationships between the functions and other classes or functions.
All apps will have an index or home page. The following shows the route design for http://www.myparalympics.com/
and http://www.myparalympics.com/events/1 and http://www.myparalympics.com/events/add.
| Route | HTTP method | Function | Wireframe reference |
|---|---|---|---|
/ |
GET | index(): Returns the home page |
01 Home |
/events/<event_id> |
GET | display_event(event_id) Returns the a page with data for the given paralympic event |
02 Event |
/events/ |
GET | events() Returns the a page with data for the given paralympic event and a form to allow a new event to be added |
03 All Events |
/events/ |
POST | events() Takes the data from the form and adds a new record to the database. Returns a redirect to to display the details of the new event. |
03 All Events & 02 Event |
Application Design for a data visualisation app (or dashboard)
You will use Plotly Dash to create the dashboard app and the python version of Plotly Express and Plotly Go to create the charts within it.
1. Decide on single page or multi-page app design
For the dashboard application design you need to consider whether to create a single or multi-page dashboard app.
Dash apps are single page apps. Single page web app architecture typically works like this:
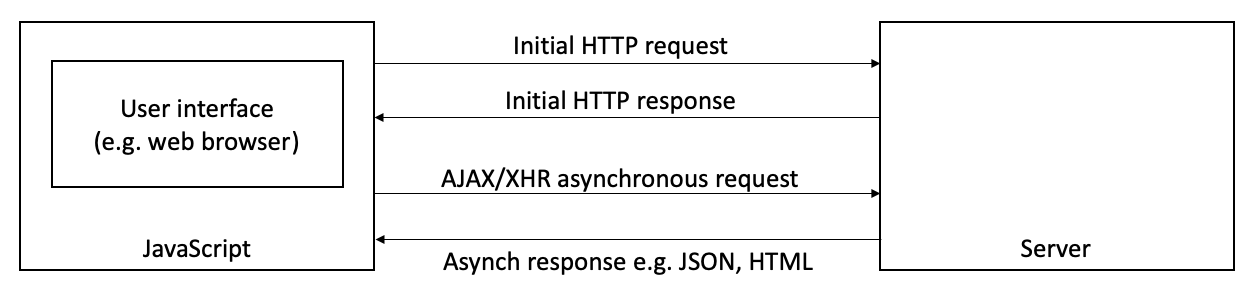
Dash implements the single page architecture by using functions, called callbacks, that update elements of the page based on user interactions.
You can add multiple single page dash pages together to form a multi-page Dash app using Dash pages.
Read or watch some of the following, and/or carry out your own research, and decide whether to design a single or multi-page Dash app. Refer to the coursework specification for what you need to write.
- Dash app examples
- Video discusses the pros and cons of single and multi-page web apps.
- Book: Interactive Dashboards and Data Apps with Plotly and Dash, 2021 ( use UCL library explore to get free online access)
2. Choose chart types
For the coursework consider the type of charts to creat within the dashboard.
As input, consider the target audience and the questions you are hoping that your dashboard will help them to answer.
The following sites can help you to select an appropriate chart type:
3. Identify functions
Consider the user stories or requirements, your overall dashboard approach, and the charts you intend to create.
Decide which elements need to be present on each page.
For example this is a single page app based on the paralympics project used in tutorials:
| Feature / Function | Description (pseudo docstring) | Chart type | Data attributes |
|---|---|---|---|
| Select Chart | Takes the question to be answered as an option and return the relevant chart/charts | N/A | List of questions |
| Show Event locations | Displays the events as points on a map with location markers | map | lat, long |
| Show Location Marker Statistics | On click, displays the statistics for each event | Tooltip | Year, Event Name, Event Type |
| Show Participants over time | Chart showing the number of athletes over time with lines for summer and winter | Line | Event Type, Participants, Year |
| Show M/F Participant Ratio | Chart showing the percetage of male and female athletes. Takes as input Winter, Summer or Both. | Stacked Bar | Event Name, Participants (M), Participants (F), Type |
| Select M/F Participant Ratio | Selector to choose Winter, Summer, or both events. Outputs the selection to the Stacked Bar Chart. | Stacked Bar | Options: Winter, Summer |
4. Identify model classes
Data may come from your dataset and/or it may be implied in your requirements.
Data from the dataset could be modelled as classes with attributes.
Other data that is used in your app but not from the dataset would also be modelled as classes.
5. Model the relationships between classes and functions
You may find it useful to combine the functions and the model classes in a single diagram that allows you to see the relationships between them.
A class diagram like structure may be used.
Review your design against the principles
Review your design against the design principles and iterate the design.
This is not easy as you are trying to critically evaluate our own work against a general design principle or pattern.
As a starting point, look at the tables or diagrams you have created and consider:
- Are the relationships between classes, modules, functions only those that are needed?
- Are the attributes and methods/functions within a class or module cohesive? If not do you need to split them into more classes, functions, modules.
- Does the structure seem clear (simple as possible)?
- Would the structure allow you to reuse components in another application?
- Is the same business logic represented in more than one place? If so then remove the duplication.
This is not an exhaustive list of questions. This aspect is challenging!
References
Refer to the reading list on Moodle.