COMP0035 Tutorial 4/5: Linting and code AI tools
The theory was delivered in the week 4 lecture. This tutorial can be started in either tutorial 4 or tutorial 5 depending on when you complete the data preparation tutorial.
- Set up your IDE for linting
- Using a linter to report issues:
- Correcting reported issues:
- Using AI to write code:
The associated code is in: https://github.com/nicholsons/comp0035-tutorial-4-5
Set up your IDE for linting
Follow the guidance for your IDE.
Visual Studio Code
You must choose which linter(s) to install and use. For example, choose flake8 or pylint. Follow the guidance to set up a linter in VS Code:
PyCharm
PyCharm differs to VS Code with several related features enabled by default, so you do not need to install a linter.
Use a linter to report issues
PyCharm GUI
-
Open
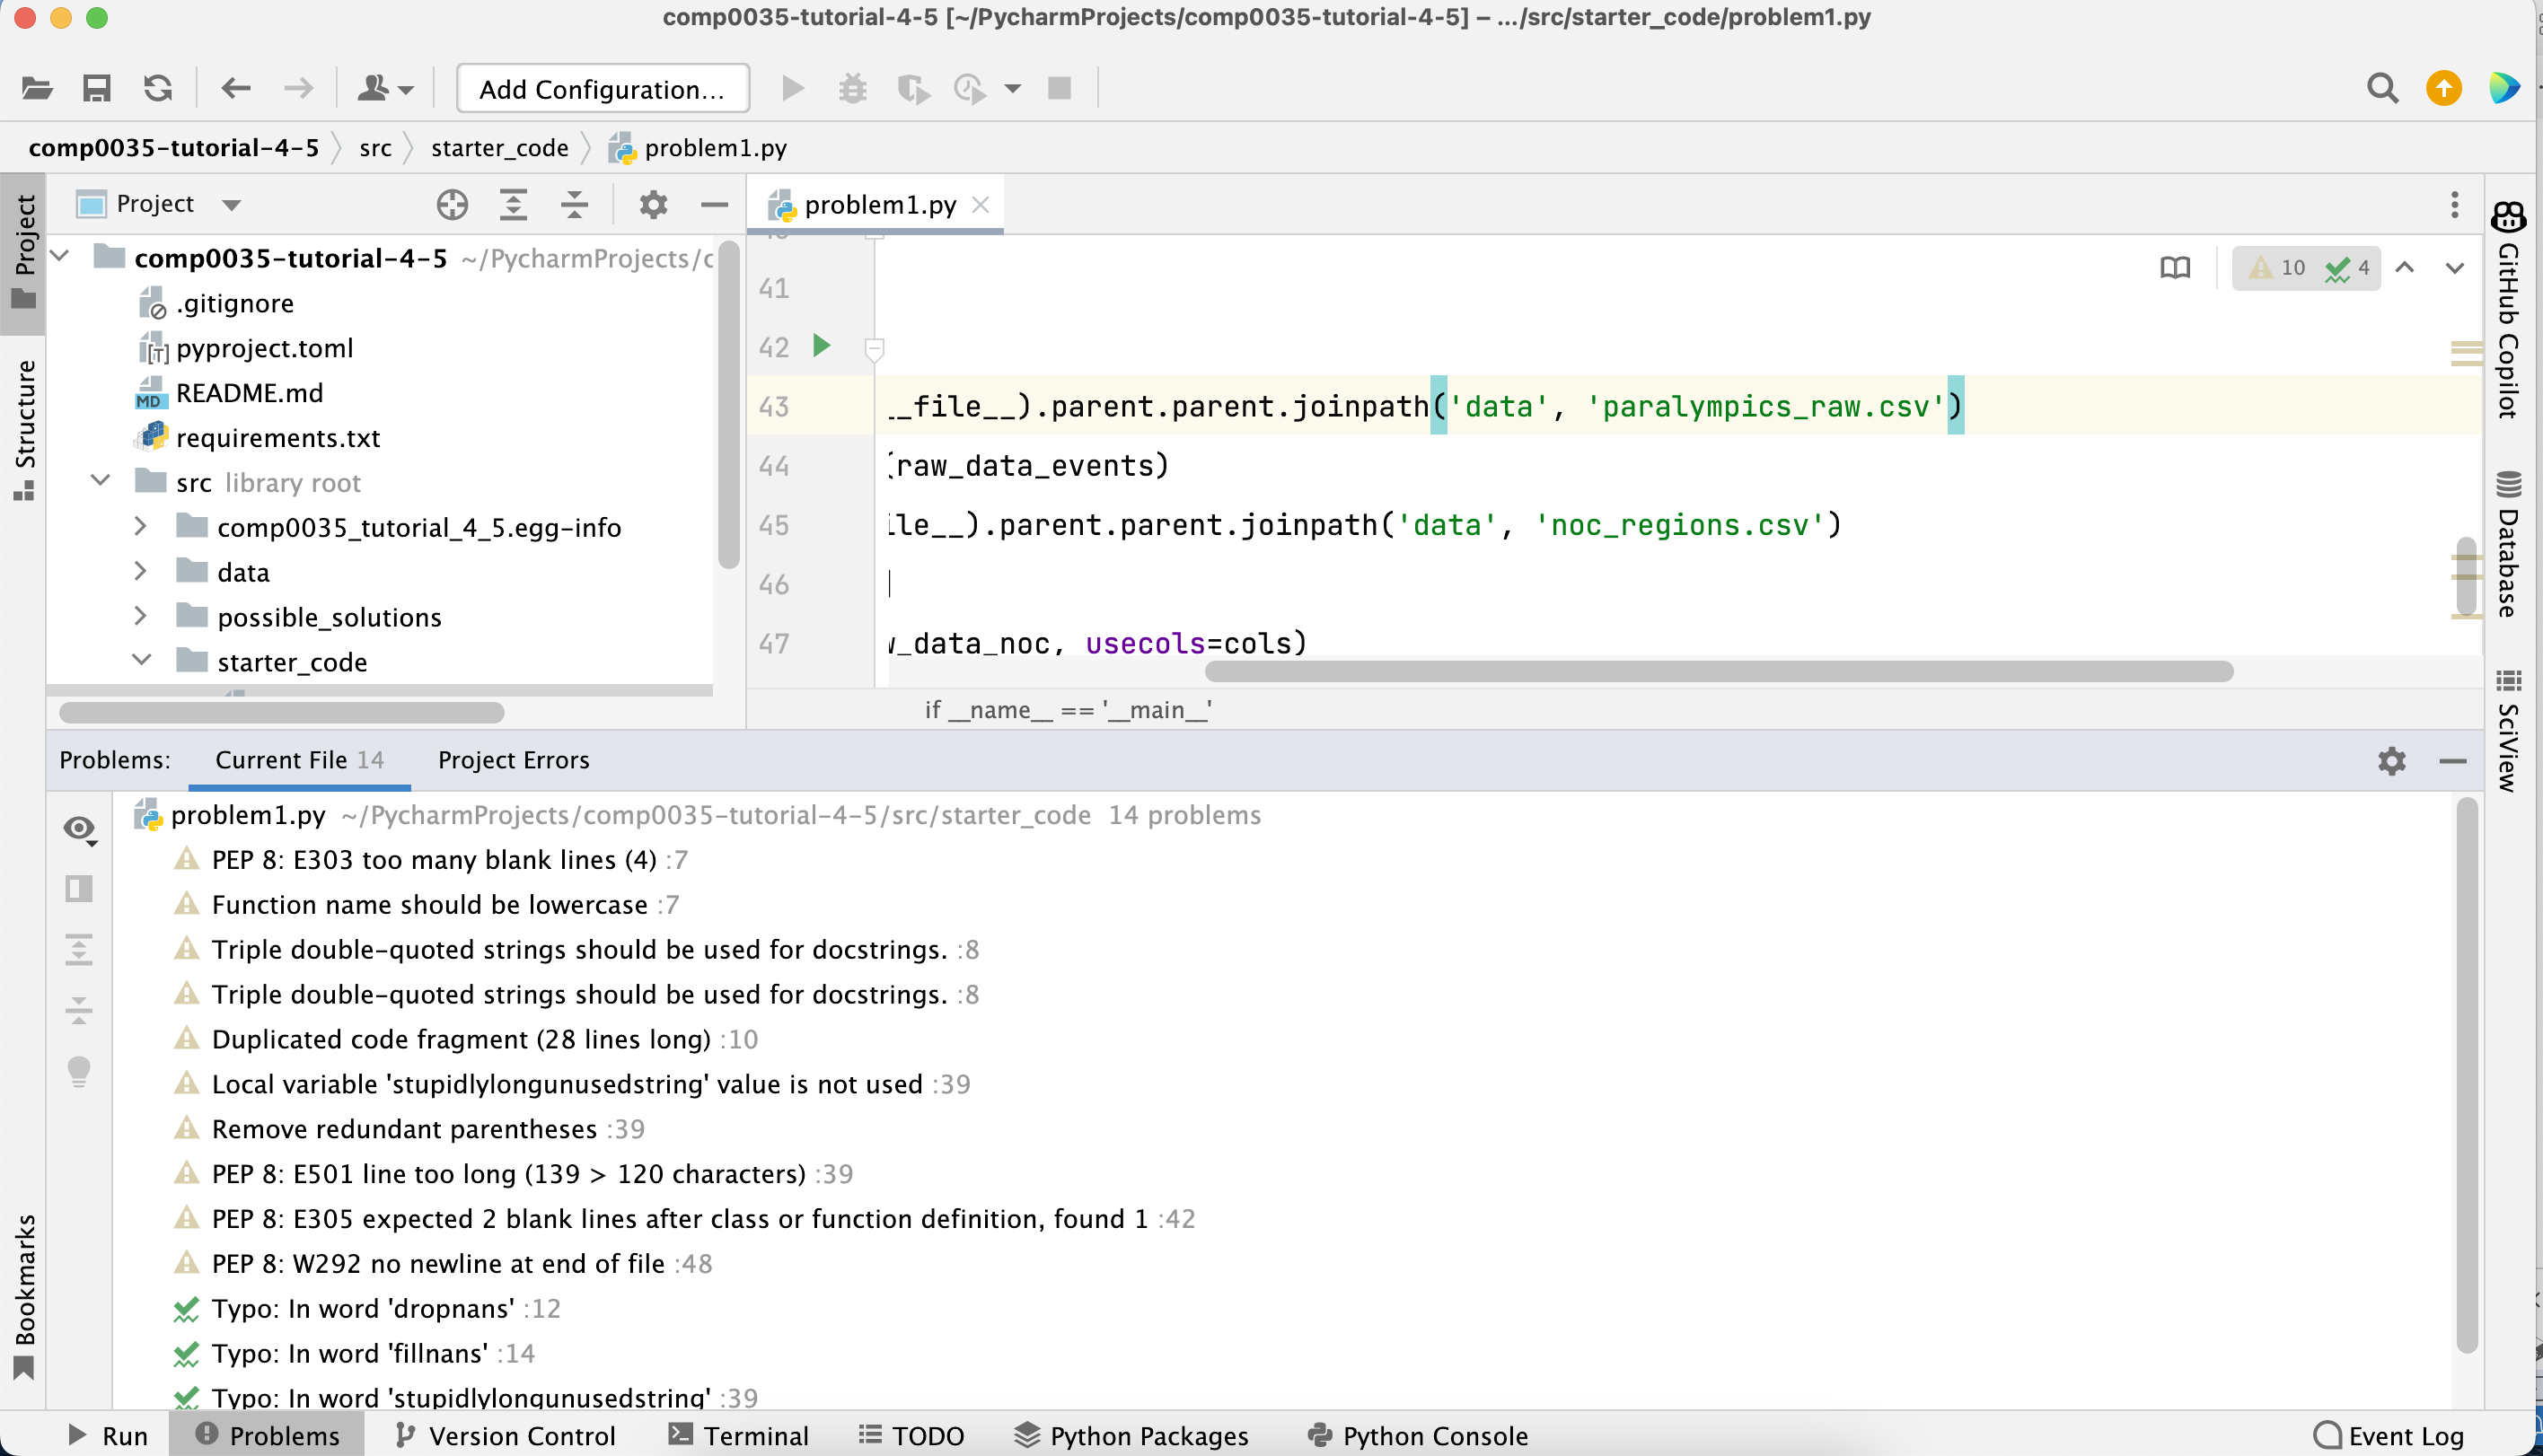
src/starter_code/problem1.py. -
In the top right corner of the code editor window you should see a small warning triangle icon and a series of numbers. Click on these.
-
You should see displayed the 'Problems' pane as follows:
-
If you click on any of the problems listed the code editor will highlight the relevant line of code. Do not correct the code yet.
VS Code GUI
- Open
src/starter_code/problem1.py. - Style issues will be identified by squiggled lines (the colour may depend on your IDE colour scheme).
- Hover over the squiggles to see the issue that is reported.
Terminal in the virtual environment
You can install a linter in the virtual environment regardless of the overall IDE settings.
-
In the venv in the Terminal of VS Code/PyCharm install flake8 and pylint:
pip install flake8 pylint -
Type the following two commands in the venv of the project using the Terminal for PyCharm or VS Code and compare the output. For speed in the tutorial, run the linter to check one file only. You would usually run the linter over all your source code rather than a single file.
pylint src/starter_code/problem1.pyflake8 src/starter_code/problem1.py -
The
problem1.pycode was written in PyCharm with a line wrapping set at 120 rather than 79; hence the warnings from flake8 about lines over 79.
You can set the
--max-line-lengthflag to tell flake8 only warn where lines are longer than 120:flake8 src/starter_code/problem1.py --max-line-length=120
Run linter and output to file
You can also save the results of linting to a file.
- Run
pylint src/starter_code/problem1.py > src/pylint-report.txt - Open
src/pylint-report.txtand you should see the linter output.
If you search online there are additional packages that can be used to output pylint or flake8 to other formats such as HTML.
-
Try installing flake8-output:
pip install flake8-output -
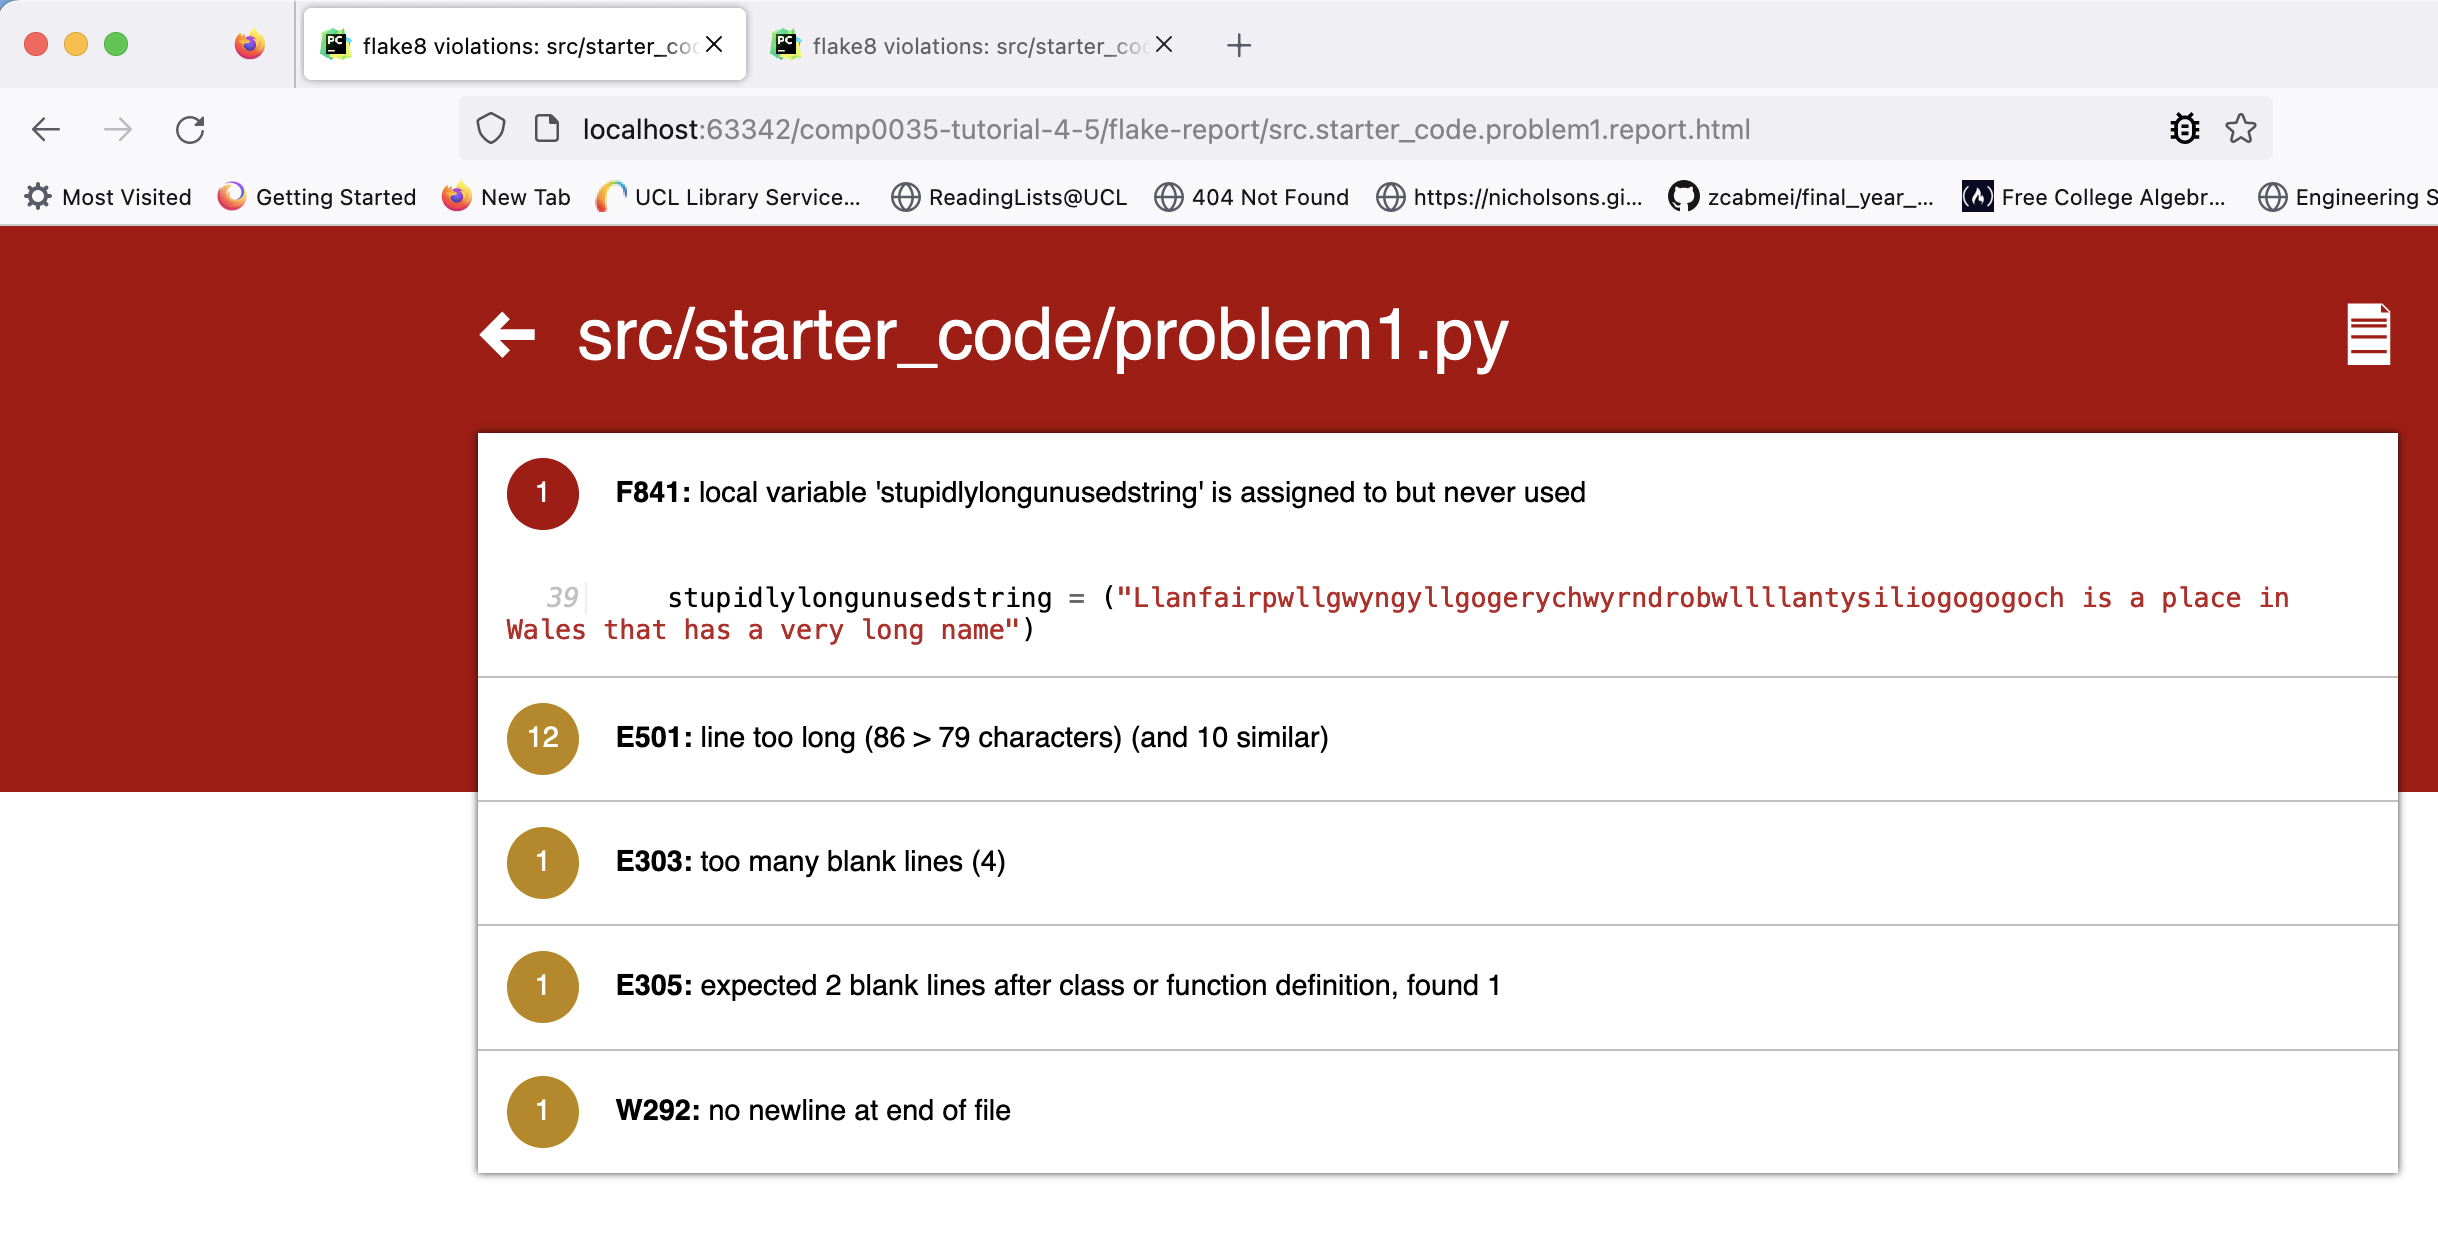
The following command will create a directory called flake-report in your project and save the report to it
flake8 src/starter_code/problem1.py --format=html --htmldir=flake-report -
Navigate to flake-report/index.html and open it in a browser. You should be able to click on the links it contains to see the issues, e.g.
Run linter in GitHub Actions
GitHub Actions are workflows that can be automated to run when a commit is made to GitHub (and on other events).
To create a workflow from a template is straightforward.
-
Open the repository on GitHub.
-
Go to the Actions tab

-
Find the rectangle for 'Python package' on the page, or use the search workflows box and type
Python package
-
Click on 'Configure'.
-
Click on the green 'Commit changes' button and again on the next prompt.
-
This will create a file called
yourreponame/.github/workflows/python-package.ymlin your repository. Open this file.- The structure of the file uses YAML.
- The 'on' sections tells GitHub to run the workflow on the master branch whenever you push code to it.
- The build section creates an environment on a GitHub server to run your code. It defaults to Ubuntu but this can be changed to Windows or MacOS if you want it to exactly mirror your computer.
- the 'matrix' tells it which Python versions to use e.g. Python 3.9, 3.10, 3.11. You can again change this to match your Python version.
- the 'steps' section has 'name's which state the steps that will be run: Setup Python, Install dependencies, Lint wit flake8, Test with pytest
- Note that the pytest section of the workflow will fail currently as you have no tests to run.
- If you wanted to change flake8 to pylint then you would need to edit the workflow file to install pylint in the ' Install dependencies' step and then change the 'Lint with flake8' section to add the command line instructions to run pylint instead of flake 8.
-
Go to the Action tab again.
-
You should see All workflows. If the workflow is still running there will be a spinning amber circle; if it finished and all was OK then it would be green; it should have a red circle with a x in it once currently as the pytest step fails. Click on the red circle icon.
-
Click again on the next red circle for 3 jobs, then again on one of the builds e.g., build (3.9).
-
You should now have a black pane that has headings that correspond to the steps that were in the .yml file ' SetupPython', 'Install dependencies' etc.
-
Find the 'Lint with flake8' section and expand it. You should see a report of issues.
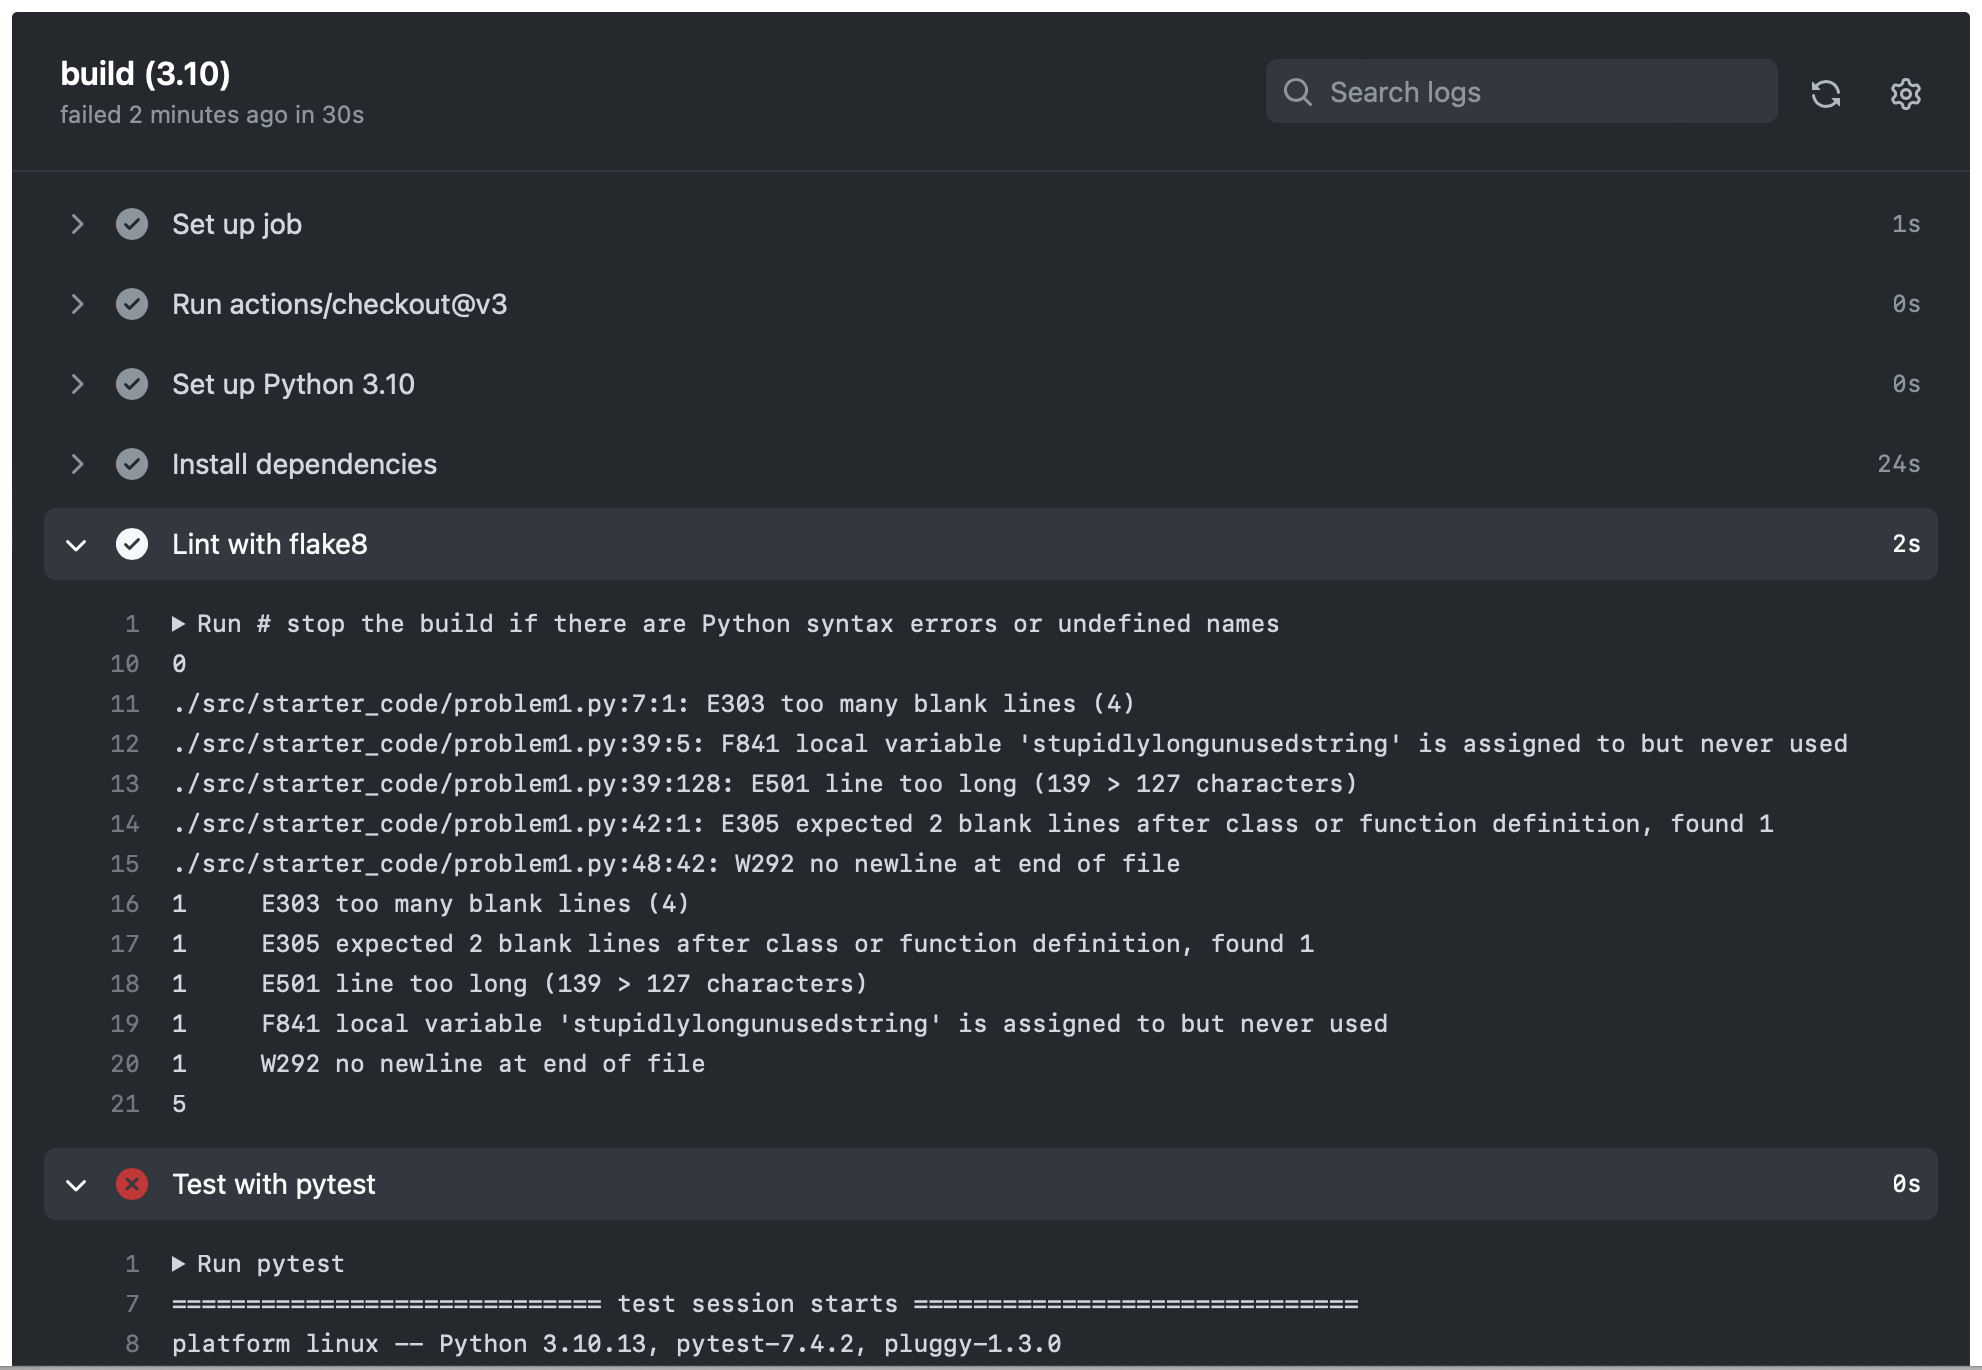
This is another way to run the linter and check the results.
You can set configuration for flake8 (or other linter) using the sections in the workflow .yml file.
Correct reported issues
PyCharm IDE to correct reported issues
Make a copy of 'problem1.py' so you have a copy to try again later.
In PyCharm there are a number of options, the following illustrates some:
- With problem1.py open, go to the menu option 'Code | Format code'. This will correct issues such as the order of the imports; blank lines between functions; line lengths. It won't correct every issue.
- Click on the small warning triangle in the upper corner of the code edit window.
- Ignore the duplicated code warning. The same code is in problem2.py so that you can practice a second time.
- Click on the 'Function name should be lowercase'. It should take you to the line of code.
- Click on the lightbulb icon that appears when you hover near 'PrepareData'. Choose 'Rename the element' and choose a
Python format name, e.g.
prepare_data. - Now correct the 'Local variable 'stupidly...' value is not use.
- Use the lightbulb again and select 'Remove statement'.
- Click on 'Triple double-quoted strings should be used for docstrings' and accept to convert it.
- No delete the entire docstring. Click the lightbulb and you should have an option to "Insert a documentation string stub" which will give you the outline of a docstring that you can then complete.
VS Code to correct reported issues
- Open
problem1.pyin VS Code. - Click on the lightbulb icon that appears when you move the cursor to 'PrepareData'.
- You should see QuickFix and be able to select to rename it. Note that if you have enabled GitHub Copilot then you may have the option to 'Fix using copilot' instead.
Refer to VS Code refactoring for QuickFix actions.
Autocorrect on file save
PyCharm
This appears possible in PyCharm from blog posts but there was no official documentation for this.
There is a useful tutorial that goes beyond the aspects in this tutorial that covers code quality features in PyCharm with example code .
VS Code
If you wish to, you can install an auto-formatter that will automatically try to correct issues as you save your work.
You will need to install a formatter extension such as black or autopep8 to enforce rules
See[Formatting Python in VS Code](https://code.visualstudio.com/docs/python/formatting
Using AI to write code
If you know what you want to achieve and can clearly specify it, then AI tools can help you to write code.
ChatGPT
You may need to create an account to sign up to chatGPT.
This method is not linked to GitHub or your code editor.
-
Open a ChatGPT session.
-
Enter the following prompt.
Write a python function that reads from a raw data file in data/paralympics_raw.csv to a dataframeUse the copy function on the window and copy and paste the code into your IDE.
The solution I got using this method is in
chat_gpt_solution1. The function includes error handling for file read. -
You can use additional prompts to change anything you don't like, e.g.:
Improve the code to use Pathlib.path to read the csv file -
I then added a prompt to use the standard dataframe functions to print information:
Add code that does the following # Print the number of rows and columns in the DataFrame using `.shape` # Print the first 7 rows of data using `.head()` and the last 6 rows using `.tail()` # Print the column labels using `.info()` or `.columns`. # Print the column data types using `.info()` or `.dtypes` # Print general statistics using `.describe()` -
And then asked it to move that code into another function:
Move the print statements into a function named print_information that prints out the infomation -
And finally asked it to add docstrings Google style:
Add a Google style docstring format to the print_information and read_paralympics_data functions -
Compare the code generated to that given
problem3.pyfrom tutorial 3.It appears to be an improved version since it also includes file error handling!
However, you need to know what you were expecting to see, or at least be able to understand the output from ChatGPT to understand whether the proposed solution is appropriate or not.
GitHub CoPilot
GitHub CoPilot in PyCharm
Follow the instructions in the link above to download the plugin and login to GitHub using the PyCharm | Tools | GitHub Copilot login option. It will require you to copy and enter a code.
- Open
ai-docstring.py - On line 1 start typing 'def ' and it should prompt you by offering a meaningful function name.
- Place the cursor by the start of the docstring, and again it should offer you code to complete the functon; you may need to select the Refresh option in the GitHub copilot window.
- Accept the code, and you should have a function with a docstring.
GitHub CoPilot in VS Code
Use the above reference to set up VS Code to work with GitHub CoPilot.
- Open
ai-docstring.py. - On line 1 start typing 'def ' and it should prompt you by offering a meaningful function name.
- Hover over the start of solution - it should correct the indentation and provide an implementation of the code.
This is only a simple example. In VS Code the CoPilot feature functions well with the lightbulb to offer auto completion of code and adding documentation to code.