COMP0035 Tutorial 2: Using virtual environments
This assumes you completed tutorial 1 and have created the 'your-git-username/practice' and 'ucl-comp0035/hell-world' repositories.
Introduction
This session introduces you to creating and using virtual environments. The learning objective is that you should have just sufficient knowledge to start using these for your coursework project and throughout the course activities.
Contents
- Add a virtual environment (venv) to a project in your IDE (10 mins)
- Run Python code in your virtual environment (5 mins)
- Add a library to a virtual environment (10 mins)
- Create a requirements.txt file (5 mins)
- Install your own code (10 mins)
- Sources of information
Add a virtual environment to a project in your IDE
Python venv provides a way for you to create and configure a Python virtual environment for each project.
A virtual environment allows you to use different versions of Python and install only the libraries you need for that particular project.
You don’t have to use virtual environment, but you should do so, and by default it will be suggested throughout this course.
If you do not use a virtual environment you will have one Python installation to which you will all add third party libraries. This can become problematic as sometimes different projects need different versions of a library than others.
You should never put your virtual environment in source code control. Instead, place configuration files with information about the packages. You will see examples of this when you get to the coursework setup activity.
In this activity you will create a virtual environment for a project you cloned last week. Use whichever project you cloned to your IDE.
This is a 2-step process:
- Create the virtual environment
- Activate the virtual environment
There are specific instructions for each IDE using their menu options to create a virtual environment:
There are several tools that allow you to create Python virtual environment in a project such as Python venv, pipenv and
poetry. You may use any. venv comes with Python so the following should work for all.
As both IDEs have a terminal window, so the following instructions should work for either IDE.
Instructions
Step 1: Create a virtual environment
-
Find and open Terminal in your IDE.
- PyCharm: View > Tool Windows > Terminal
- VS Code: View > Terminal
-
At the terminal command prompt type the code to create the "venv".
- Unix/macOS:
python3 -m venv .venv - Windows:
py -m venv .venv
The code
python3 -m venv .venvmeans:python3 -mis the macOS version of the code to run a python modulevenvis the Python package or module that will be used to create a virtual environment.venvis the name of the folder or directory within your project that the virtual enviornment will be created in. The.makes it a hidden folder; useful as you do not want to make manual changes to this folder. By convention call this folderenv,venv,.envor.venv. By adhering to this naming convention the.gitignorefor this project will then exclude it from source code control (which is what you want in this case).
The following shows the terminal in VS Code:
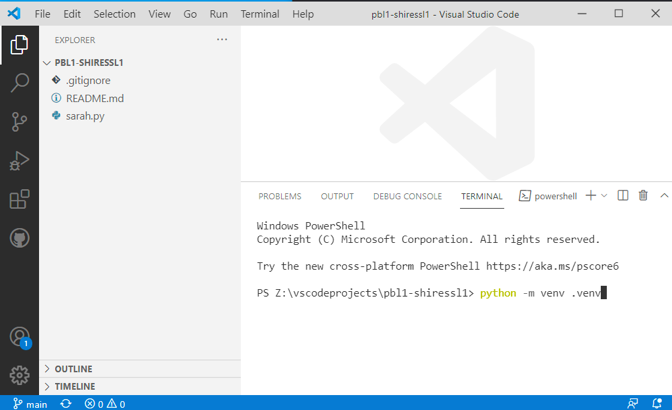
The command will take a few minutes to complete.
Once complete you may see the virtual environment folder in the Project files. If you created a hidden folder then depending on your system config you may not see the folder. You do not need to be able to see it.
- Unix/macOS:
Activate a virtual environment
You now need to activate the virtual environment for the current project.
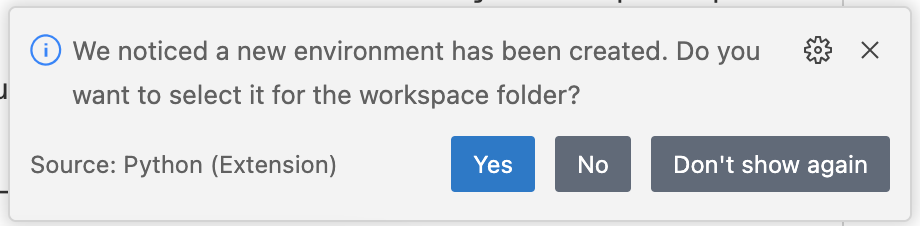
VS Code usually prompts to ask if you want to activate the environment after you create it; which you should accept.
Delete the current terminal window ('bin' icon in the image below) and open a new Terminal window.

Check if the environment has been activated. You can confirm you’re in the virtual environment by checking the location of your Python interpreter:
- Unix/macOS
which python - Windows
where python
For a visual clue, the command prompt in your Terminal in VSCode and PyCharm has an indicator with the name of the
virtual environment folder in brackets at the start. In the following example it is (.venv):
(.venv) yourcomputername:yourreponame yourusername$
If the virtual environment is not activated then activate it by
entering code in the Terminal
. In the following replace env with the folder name you created the virtual environment in.
- Unix/macOS:
source env/bin/activate - Windows:
.\env\Scripts\activate
VS Code Windows Powershell error on activating an environment
The first time some students try to activate a virtual environment on Windows they receive an error message warning that scripts cannot be run, e.g.:
\Scripts\activate.ps1 cannot be loaded because running scripts is disabled on this system. For more information, see about_Execution_Policies
at https:/go.microsoft.com/fwlink/?LinkID=135170.
This happens as VS Code tries to use the PowerShell rather than Command Prompt in the Terminal.
Two solutions are explained in this article .
- Set the terminal to default to command prompt instead
- Relax your Windows powershell execution policy
Steps for solution 1 are given as follows:
- From the VS Code View menu, open the Command Palette.
- Type "default shell" (without the parentheses) in the Command Palette's search bar.
- Select the command "Terminal: Select Default Profile".
- Select "Command Prompt".
- If you have any Terminals already open in VS Code (you probably do), close them all by clicking on the Trash icon at the top of each Terminal.
- From the VS Code Terminal menu, create a New Terminal.
- This newly created VS Code Terminal will be using Command Prompt (similar to what you would see if you opened a Command Prompt from the Windows Start Menu.)
Steps for solution 2 are given as follows:
By default, Windows does not permit you to run PowerShell scripts unless you have opened PowerShell with elevated permissions (explicitly "open as administrator.") This protects beginners from accidentally running inappropriate scripts. However, if you are comfortable using PowerShell carefully and prefer to use it rather than Command Prompt in VS Code Terminals, then you may remove this restriction if your IT does not prevent you.
-
From the Windows Start Menu, open a PowerShell window.
-
Execute the following command in that window:
Set-ExecutionPolicy -Scope CurrentUser -ExecutionPolicy Unrestricted -
You will be asked the following question:
Execution Policy Change
The execution policy helps protect you from scripts that you do not trust. Changing the execution policy might expose you to the security risks described in the about_Execution_Policies help topic at https:/go.microsoft.com/fwlink/?LinkID=135170.
Do you want to change the execution policy?

[Y] Yes [A] Yes to All [N] No [L] No to All [S] Suspend [?] Help (default is "N"):
Respond "Y".
Run Python code in your virtual environment
Now that you have a working Python environment you should be able to execute, or run, Python code.
Instructions
The following is for VS Code, though it is very similar in PyCharm:
-
Create a Python file in your IDE. There are different ways to do this (e.g. File > New). In VS Code the following used the icon (a page with a + symbol) below and entered the filename as
temp.py:
-
Add code to the file. VS Code editing code
if __name__ == "__main__": print("this is a temporary file") -
Save the file and then run the code using the triangular icon to the top right of the screen (PyCharm & VS Code).
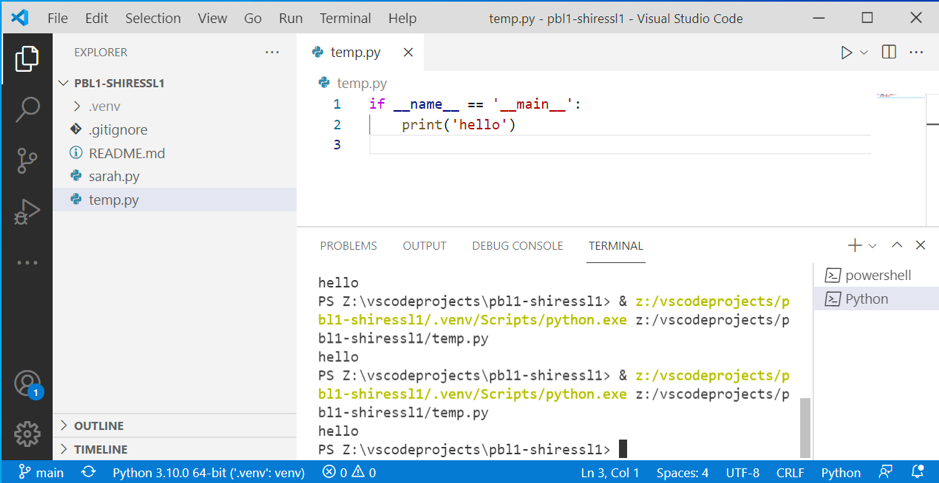
You can also run the code from the Terminal command prompt:
- Unix/macOS:
python3 temp.py - Windows:
py temp.py
Or right click on the file in the project files list and select 'Run Code' (VS Code) or 'Run temp.py' (PyCharm).
- Unix/macOS:
Challenge: Commit and push the changes you just made to GitHub!
Add a library/package to a virtual environment
There are several tools that allow you to manage dependencies in a project such as pip, poetry, pipenv. pip is
sufficient for this project, though you can use others if you prefer.
We use two techniques in this course using the pip install command.
The first installs several packages at once from those listed in a file named requirements.txt. The second installs
one package (though you can install several at a time).
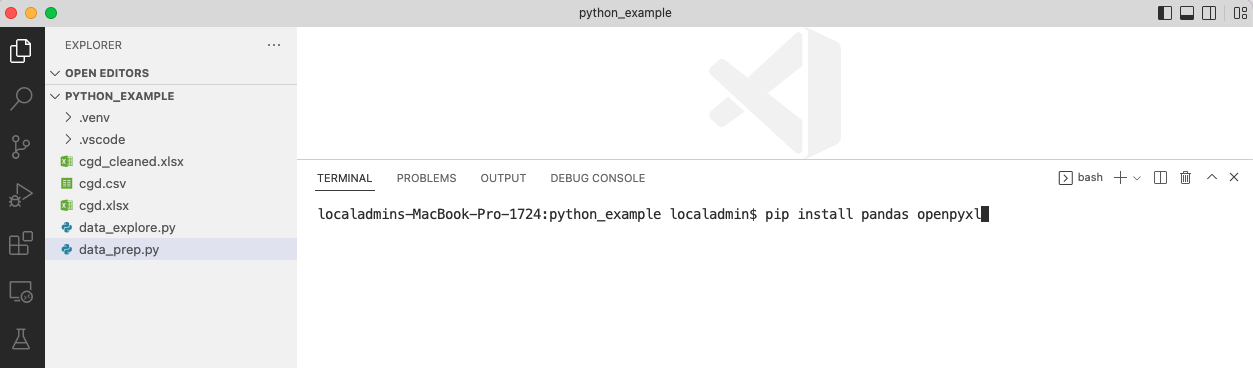
pip install -r requirements.txtinstalls all the packages listed in a file namedrequirements.txtpip install pandasinstalls the specified package, in this examplepandas; or this example installs pandas and pytest:pip install pandas pytest
Find the correct syntax for your operating system and then use it to install the pandas package in your virtual environment.
This may take a few minutes to complete during which your computer will find, download and install the necessary
packages and any dependencies (e.g. pandas requires numpy to also be installed).
Other useful pip commands are:
pip listwhich lists the packages that have been installed and their versionspip install --upgrade <name of package to updagrade>to upgrade to the latest version of one or more packagespip freeze > requirements.txtto create a requirements.txt file with all the packages installed in your venv
Create a requirements.txt file
Once you start working on a code project you are likely to install packages in your virtual environment that differ to your initial project setup.
To allow other developers to create a virtual environment with the necessary packages to run your code, add these packages to a requirements.txt file.
The file is plain text, however you need to follow the syntax for it to work with pip.
You could manually add these to a requirements.txt following the documentation .
A quicker way to do this is to use
the pip freeze
command:
pip freeze in the terminal will show which packages are installed and their versions and display it in the terminal
window
To save these to a requirements.txt file use:
pip freeze > requirements.txt
Note that when you used pip install pandas, pip also installed any packages that pandas relies on. When you
run pip freeze, you will see not just pandas but also the other packages, e.g.,:
numpy==1.26.0
pandas==2.1.1
python-dateutil==2.8.2
pytz==2023.3.post1
six==1.16.0
tzdata==2023.3
If you manually create a requirements.txt you only need to add pandas. The following would , install the latest version of pandas and any dependent packages:
requirements.txt
=================

pandas
Install your own code
You are not allowed to publish your coursework so will not distribute it as a package. However, the testing package, pytest, recommends that you install your own package as code .
There are several tools for packaging (some of which are also used for managing environments) e.g., setuptools, poetry.
The following uses setuptools as this is included by default in your virtual environment (though you can use any other
tool for the coursework).
Instructions
-
Create a
pyproject.tomlfile in the root of the practice project with the following:[build-system] requires = ["setuptools"] build-backend = "setuptools.build_meta" [project] name = "practice" version = "0.0.1" readme = "README.md" requires-python = ">=3.8" dependencies = [ "pandas", "pytest", ]For more detail on the options you can include in the file refer to the following:
-
Move your project code into a new folder/directory.
You typically create a tree structure for projects to separate your code from config and other files.
If you do not do this the subsequent step will fail with an error message:
  × Getting requirements to build editable did not run successfully.
  │ exit code: 1
  ╰─> [14 lines of output]
      error: Multiple top-level modules discovered in a flat-layout: ['practice', 'temp'].
Create a folder/directory named
srcand move your code files to it.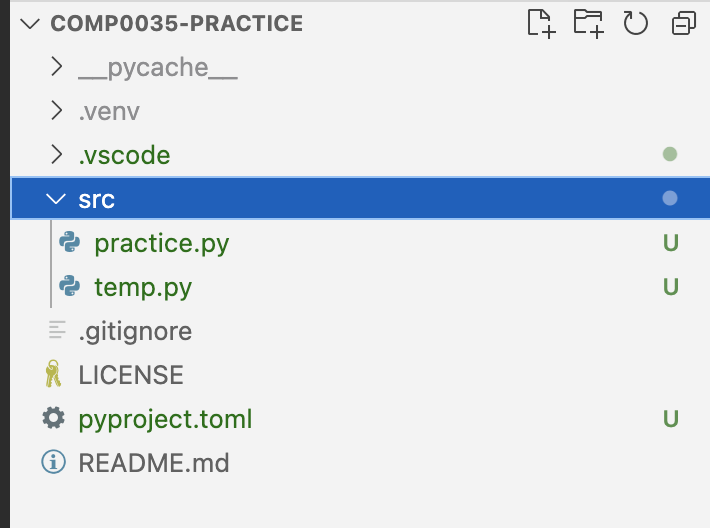
-
Install your own code in editable mode
pipcan be used to create an editable installation.Editable installs allow you to install your project without copying any files. Instead, the files in the development directory are added to Python's import path. This approach is recommended by pytest.
With an editable install, you only need to perform a re-installation if you change the project metadata.
Run the following in the Terminal of the project:
pip install -e .The
.is not a mistake, you need to include it.You should see a message in the terminal such as:
Successfully built practice
Installing collected packages: practice
Successfully installed practice-0.0.1
If you look in the project explorer you should now see a folder called
practice.egg-infothough this may depend on your system setting as it is a hidden folder.
Currently this makes no appreciable difference to your project. It will become important later in the course when running tests.
Python packages and modules
An understanding of packages and modules will help you not only in packaging, but also when you try to import your code.
In COMP0015 you may have created code that was in a single python file. As you start to create apps it is considered good practice to separate code.
A Python project with code, tests, configuration and other information might have a structure that looks something like this:
project-name/
├── README.md
├── LICENSE
├── pyproject.toml
├── requirements.txt
├── .gitignore
├── .venv/
├── src/
    ├── package1/
        ├── __init__.py
        ├── module1.py
        └── module2.py
    ├── package2/
        ├── __init__.py
        ├── module1.py
        └── module2.py
├── tests/
    ├── test_core.py
    └── test_helpers.py
See Python application layouts for more examples.
Any python file is a module. If you want to use code from this module in another module, then you can import it using:
import my_module
A package is a collection of modules in a folder/directory that typically has an additional file, __init__.py within
it. __init__.py can be an empty file. One way to import a module in a package:
from package1 import module2
From Python 3.3 you can also define implicit namespace packages. Since most beginner tutorials and materials referenced in this course use the first method mentioned above then we will not cover implicit namespace packages.
The creation and use of modules and packages is a larger topic than the simple explanation here so during the course you may need to refer to other sources: